
The space under your kitchen sink is prime real estate, and most of us waste it. Between the pipes, the cleaning supplies, and mystery bottles that have been there for years, that cabinet becomes a jumbled mess that nobody wants to open. A pull-out storage system changes that equation. Instead of reaching into a dark corner and knocking things over, you get organized access to everything you need. Whether you’re dealing with a cramped apartment kitchen or a sprawling home, pull-out solutions make the most of every inch and keep your cleanup supplies actually findable.
Table of Contents
ToggleKey Takeaways
- Under kitchen sink pull out storage systems eliminate clutter and wasted space by providing organized, accessible storage for cleaning supplies and everyday items.
- Three main types of pull-out solutions exist: sliding shelf units ($40–$150), tilting and rotating systems ($100–$300), and drawer organizers, each suited to different cabinet layouts and plumbing configurations.
- Proper installation requires precise measurement of cabinet dimensions, accounting for pipes, level mounting of slide tracks, and testing for smooth gliding motion before loading items.
- Load capacity for ball-bearing slides is typically 50–75 pounds per slide; overloading will damage the hardware and reduce functionality.
- Effective organization of your pull-out storage involves sorting items, grouping similar products, using secondary organizers like stackable bins, labeling everything, and maintaining clearance around plumbing.
Why Under Sink Storage Matters for Your Kitchen
Your under-sink cabinet is one of the hardest-working spaces in the kitchen. It holds cleaning chemicals, trash bags, sponges, and whatever else you don’t want visible. Without proper organization, items shift around, bottles tip over, and you end up losing things in the back. That wasted space also means clutter pushes into your actual cabinet, making the whole kitchen feel cramped.
A well-designed pull-out storage system solves this in one move. It maximizes vertical space, keeps things within arm’s reach, and, critically, works around the pipes that make this cabinet tricky to begin with. Pull-outs also reduce the awkward bending and reaching that goes with a standard cabinet. If you’re tired of digging around in there, a pull-out system is one of the smartest small upgrades you can make.
Types of Pull-Out Storage Systems
Pull-out storage comes in several flavors, each suited to different cabinet layouts and needs. Understanding your options helps you pick what works for your space and budget.
Sliding Shelf Units and Drawer Organizers
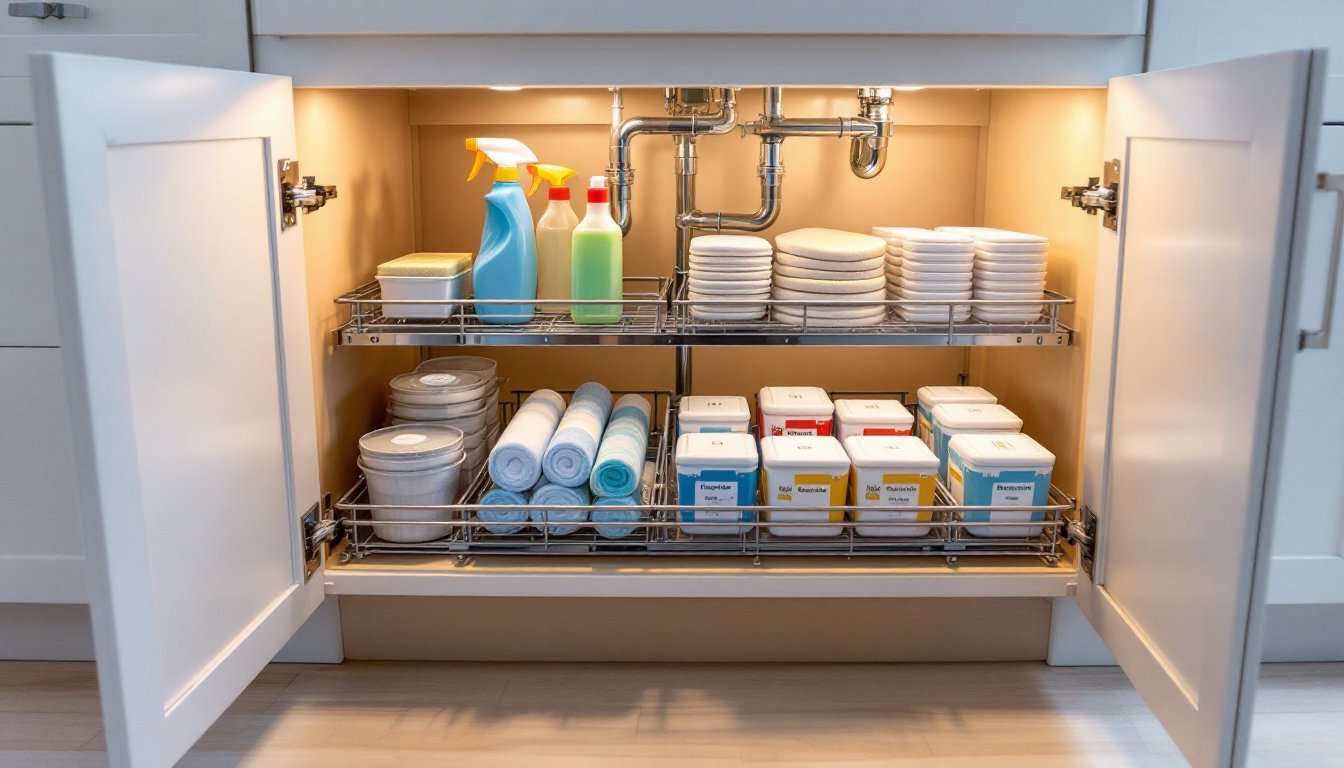
Sliding shelf units are the workhorse of under-sink storage. These are typically made from plastic or metal-frame trays that sit on ball-bearing slides mounted to the cabinet sides. A standard unit holds two shelves and extends almost fully out when you pull the handle, giving you clear access to items in the back. They cost between $40–$150 depending on materials and quality.
Drawer organizers are smaller cousins, think compartmentalized trays that help you group small items like sponges, brushes, and spray bottles. You can use these inside a pull-out shelf for extra organization or mount them to a door. The advantage here is that everything gets a designated spot, so you’re not fishing around for what you need.
Both types work with standard two-door under-sink cabinets (approximately 30–36 inches wide). Measure your cabinet depth, width, and height before ordering: most pull-out systems are adjustable within a range, but tight fits require careful planning.
Tilting and Rotating Solutions
Tilting and rotating systems are clever alternatives if you have awkward plumbing or limited depth. A tilting tray hinges at the bottom and pulls out at an angle, letting you access items without fully extending the shelf. Rotating carousels spin outward, which works well in corner cabinets where a straight pull-out would hit the adjacent cabinet door.
These are pricier, $100–$300, but they earn their cost in tight spaces. They also tend to be more durable because there’s less sliding stress on the hardware. If your under-sink plumbing is complex or your cabinet is shallow, a tilt or rotate system often beats a standard sliding shelf.
Installation Tips for Maximum Functionality
Installing a pull-out storage system is a straightforward DIY job, but getting it right matters. Here’s what you need to know before you start.
Measure twice. Seriously. Measure your cabinet’s interior width, depth (from the cabinet face to the back wall), and height. Account for the pipes, they’ll take up 6–12 inches of depth, and your shelves must clear them. If plumbing takes up too much space, a tilting or rotating system works better than a sliding shelf.
Clear out the cabinet completely and remove the existing shelf if there is one. Sand the cabinet bottom lightly with 120-grit sandpaper to remove any rough spots: this helps the slide hardware sit flat. Wipe down with a damp cloth and let dry.
Mount the slide tracks to the cabinet sides using the provided wood screws (typically #8 or #10, about 1.25 inches long). Use a level to ensure the tracks are perfectly horizontal, if they’re off even slightly, your pull-outs will drift. Pre-drill holes to avoid splitting the cabinet sides, especially if you have plywood cabinets. Attach the slides about 1–2 inches from the top and bottom of the cabinet opening.
Attach the pull-out shelf or tray to the slides per the manufacturer’s instructions. Test the motion, it should glide smoothly without binding or tilting. If it sticks, check that the tracks are level and that nothing inside the cabinet is in the way. Apply a dry lubricant (like PTFE spray) to the slides if they feel rough: avoid oil-based lubricants that attract dust.
For the ball-bearing slides that come with most systems, load capacity is typically 50–75 pounds per slide. Don’t overload, it’ll wear out the hardware and damage your cabinet. Under-sink organization ideas can help you decide what items actually belong under there before you start.
Organizing Your Pull-Out Storage Space
A great pull-out system is only half the battle. How you organize it makes the real difference between convenient and chaos.
Start by sorting everything you keep under the sink: cleaning supplies, trash bags, recycling bins, sponges, dishwasher pods, and anything else that lives there. If you haven’t used something in six months, it goes. Then group like items, all sprays together, all cloths and brushes in one area, and so on.
Use secondary organizers to maximize the space. Stackable plastic bins (about 8–12 inches tall) keep spray bottles corralled and prevent them from rolling around. Small drawer dividers work for sponges and brushes. If you have two pull-out shelves, dedicate the top one to daily-use items and the bottom one to backup supplies or bulky items.
Label everything, even if it seems obvious. A small label maker takes five minutes and saves you from grabbing the wrong bottle in a rush. It also reminds family members where things belong, so they actually get put back.
Consider your plumbing layout when placing items. Keep cleaning chemicals away from any exposed pipes, and don’t stack things so high that they could shift and hit pipes during the pull-out motion. Leave at least a couple of inches of clearance above your tallest items.
If you’re working with a really tight space, IKEA hackers have detailed a DIY pull-out tray approach using affordable IKEA components. It’s worth checking out if you want a budget-friendly custom solution. Also, kitchen organization ideas often include under-sink storage tips that can complement your pull-out system beautifully.
Conclusion
A pull-out storage system transforms that chaotic under-sink cabinet into a functional, organized space. Whether you go with a sliding shelf, a tilting tray, or a rotating carousel, the payoff is the same: easier access, better use of space, and no more reaching into the dark. Measure carefully, install the hardware properly, and organize thoughtfully, and you’ll wonder why you didn’t do this sooner.