
A cordless drill is one of the most-used tools in any home workshop, but it’s only useful if you can actually find it when you need it. Many homeowners toss their drills into a junk drawer, leave them on the workbench, or bury them under pile of other tools, then get frustrated searching for the battery when a project calls. Smart cordless drill storage isn’t just about keeping your garage neat: it’s about protecting your investment, extending battery life, keeping bits and accessories organized, and making your next project faster to start. In this guide, we’ll walk through practical storage solutions that fit different spaces, budgets, and workshop layouts.
Table of Contents
ToggleKey Takeaways
- Proper cordless drill storage protects your investment by preventing battery degradation from extreme temperatures, humidity, and moisture exposure.
- Wall-mounted options like pegboard systems and magnetic strips maximize space efficiency and keep your drill visible and accessible at a glance.
- A dedicated charging station with climate control and organized battery labeling ensures lithium-ion batteries perform optimally and extends their lifespan.
- Portable storage solutions such as tool bags and rolling carts offer flexibility for renters and multi-location workers while keeping bits and accessories organized.
- Strategic cordless drill storage placement within arm’s reach increases project completion rates and improves overall workshop safety and workflow efficiency.
Why Proper Cordless Drill Storage Matters
A cordless drill is an investment, a good one can run $100 to $400 or more, and how you store it directly affects how long it lasts. Batteries degrade faster when exposed to extreme temperatures, humidity, and moisture. Leaving your drill loose in a damp garage or unorganized cabinet invites corrosion on contacts and weakens the lithium-ion cells. When the battery sits uncharged for months, it’ll lose capacity, sometimes permanently.
Beyond battery health, proper storage keeps you safe. A drill with a bit still chucked is a trip hazard and an injury waiting to happen. Loose bits scattered in a drawer can damage your tool bag or puncture a hand. And from a workflow perspective, knowing exactly where your drill, charger, spare batteries, and bits are saves real time on every project.
Good storage also keeps your workspace functional. Whether you’re working in a dedicated shop, a garage corner, or a hall closet, a system that holds your drill within arm’s reach, not buried under clutter, makes you more likely to tackle repairs and improvements. A homeowner with quick access to tools tends to start more projects, not fewer.
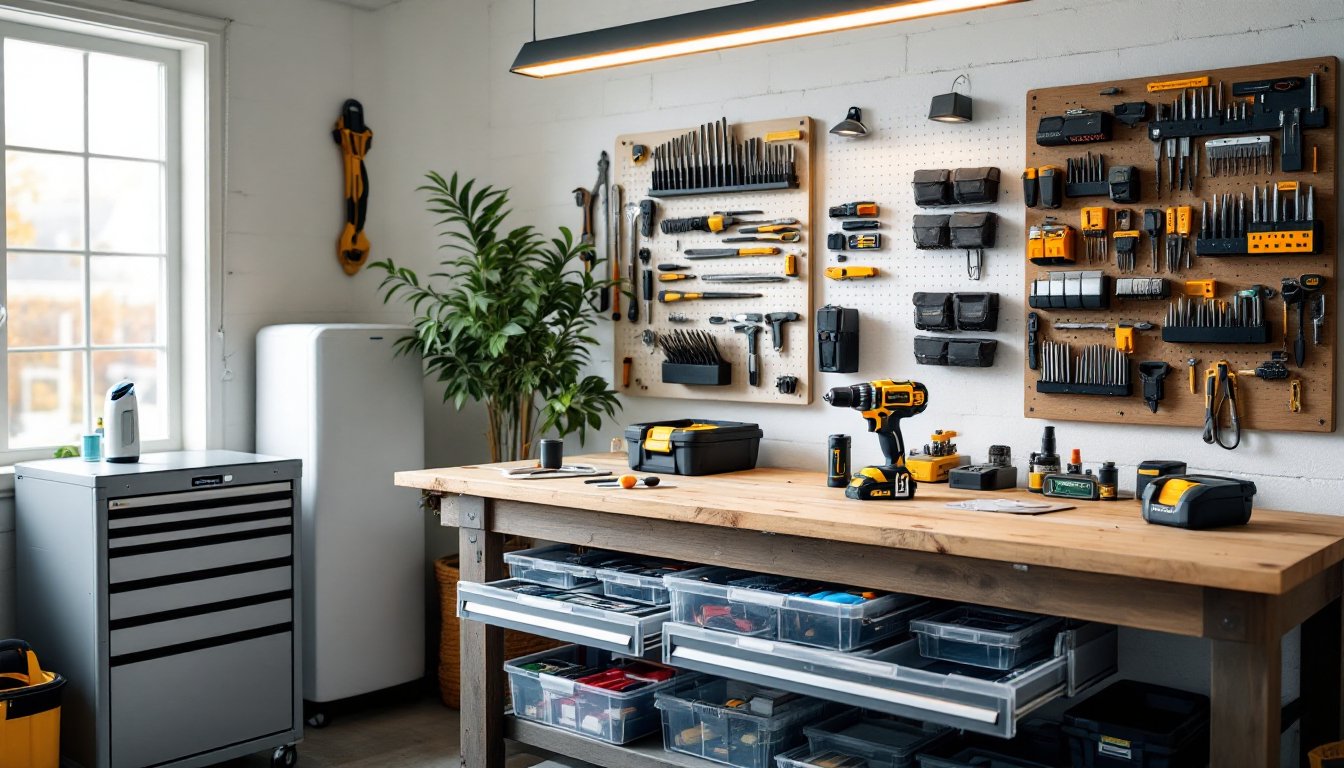
Wall-Mounted Storage Options
Wall space is often the most underused real estate in a garage or workshop. Installing a wall-mounted system gets your drill off the floor, out of the way, and visible at a glance. This works especially well in smaller spaces where floor or bench storage isn’t practical.
Pegboard Systems and Magnetic Strips
Pegboard is the classic choice for a reason. A 4×8 sheet of 1/4-inch hardboard pegboard costs $15–$30 and mounts directly to studs or wall anchors. Pair it with peg hooks ($0.50–$2 each) sized to your drill’s handle. The beauty of pegboard is flexibility, you rearrange hooks as your collection grows or your workshop needs change. Paint or stain the board to match your space: it doesn’t affect function.
For magnetic strips, opt for heavy-duty steel bar magnets (not flimsy craft versions). Mount a 12–24 inch strip at eye level on a stud or solid backing. These work well if your drill has a metal body or steel components, test your drill’s magnetism before committing. Magnetic strips are space-efficient for small shops but limit you to one or two tools per strip.
Both systems need proper wall anchors if you’re not hitting studs. Use toggle bolts or heavy-duty expanding anchors rated for at least 25 pounds per anchor: most drills and batteries weigh 5–8 pounds, so one anchor per drill is usually safe. But, if your wall is drywall-only with no stud backing, drill pilot holes and space anchors 16 inches apart to distribute weight. Mark stud locations with a stud finder ($15–$50) before hanging anything: it takes 2 minutes and saves the aggravation of pulling things down later.
When setting up your pegboard or strip, mount the charger at a convenient height, usually 42–48 inches from the floor, so charging cables reach a nearby outlet without kinking. A power strip mounted behind the pegboard keeps cords organized and gives you flexibility to add more chargers later. Many DIYers also hang a small shelf or caddy above the pegboard for frequently grabbed items like a headlamp or bit set.
Portable and Movable Storage Solutions
Not everyone has a dedicated workshop, and renters often can’t mount anything to walls. Portable storage lets you keep your drill ready wherever you work, inside for small tasks, outside for deck repairs, or in the garage when the weather clears.
Tool Bags and Rolling Carts
A good cordless drill tool bag runs $30–$80 and typically includes pockets for bits, a battery slot, a charger pouch, and a main compartment. Look for bags made from ballistic nylon or canvas (at least 600 denier thickness) with padded drill pockets. Cheap bags let your drill bounce around, risking damage to the chuck or motor housing. If you own two drills or want to store a driver and a hammer drill together, consider a dedicated drilling tool organizer bag with compartments sized for your specific models.
For a more permanent workshop setup that’s still movable, a rolling tool cart offers serious capacity. Carts with three to five drawers run $80–$250 and typically handle a drill, multiple batteries, bits, fasteners, and hand tools all at once. The key feature is drawer depth and locking mechanisms: a shallow drawer lets your drill tip or batteries shift. Look for carts with a solid metal frame, not stamped steel that flexes under load. If your cart will roll across concrete or gravel, swappable rubber casters ($5–$15 each) are worth it, they’re quieter and easier on older garage floors.
Portable storage also works well for drilling into organizing your garage space where you might combine your drill kit with other power tools. Many DIYers keep a rolling cart near the main workshop zone and a smaller bag in the truck for job-site work. This splits-the-difference approach keeps your primary drill accessible without forcing you to drag a full cart everywhere.
Charging Station and Battery Management
Batteries are the heart of cordless drill ownership, and how you store and charge them matters as much as how you store the drill itself. Lithium-ion batteries, the standard in modern cordless tools, perform best when kept at room temperature (60–75°F) and away from direct sunlight, extreme cold, and humidity above 80 percent. A garage in Minnesota or Florida faces different challenges, so your charging setup needs to account for your climate.
A dedicated charging station is worth the space it takes. This can be as simple as a weatherproof cabinet mounted on the wall with a power strip inside, or as organized as a multi-battery charging dock designed for your drill brand ($40–$100). If you own batteries from different brands or have multiple drills, a universal charging dock accepts most standard battery types. Check compatibility before buying, some docks charge only one brand of battery.
Keep batteries in a cool, dry spot. If your garage gets extremely cold in winter, bring batteries inside for charging and storage: cold slows charge cycles and can reduce capacity. If it’s hot and humid, consider a small dehumidifier box or silica gel packets ($3–$10) in your storage cabinet. Replace gel packets or run the dehumidifier weekly if your garage stays above 70 percent humidity year-round.
Label your batteries with a permanent marker, note the purchase date and voltage (18V, 20V, 60V). This helps you rotate older batteries into rotation before they degrade and signals when it’s time to retire a worn battery pack. Store fully charged batteries separately from dead ones so you know at a glance which are ready to use. Most pros keep one battery on the charger and one in the drill, leaving a third and fourth as backup, adjust based on how often you work.
Conclusion
Smart cordless drill storage isn’t complicated, but it does make every project easier. Whether you mount a pegboard, roll out a tool cart, or set up a weatherproof charging station, the goal is the same: keep your drill accessible, protected, and ready to work. Start with what fits your space and budget, a pegboard and magnetic strip can be upgraded to a rolling cart later, and adjust as your tool collection grows. Woodworking project plans and workshop guides can help you design a custom storage wall, or check out detailed drill storage strategies from experienced builders. A few hours spent organizing your tools now pays dividends every time you reach for your drill.